-
[Project] Nest 넘어져보기 (Service, Repository 분리)Project 2023. 4. 18. 09:19

시작하며
nest 프로젝트를 하면서 Service와 Repositoty를 분리하는 것이 좋다는 조언을 얻었습니다. 저는 Service계층에서 직접 DB에 접근하는 방법을 쓰고 있었고, 구글링을 통해 @EntityRepository()를 사용해서 Service와 Repository를 분리하는 방법을 알아냈습니다. (현재 작업 중인 프로젝트에서 typeORM을 쓰고 있습니다)
마주친 문제
typeorm 0.3.x 버전 이후 해당 @EntityRepository()를 사용하게 되면 deprecated라는 문구를 보게 되며, 사용이 불가하다는 사실을 알게 됩니다. 이에 대한 문제 해결을 다루어 보려 합니다.
문제 개선 전)
@Injectable()
export class UserService {
  constructor(
    @InjectRepository(UserRepository)
    private userRepository: Repository<User>   <- 이 부분
  ){}
}
이렇게 Service에서 typeORM이 제공하는 Repository<Entity>를 통해 Entity에 접근할 수 있지만, 이 부분을 분리하여 문제를 해결해 보려 합니다. 이 문제를 해결하기 위해 Custom Repository를 사용해야 합니다.
Custom Repository 생성
커스텀 데커레이터 생성
// typeorm-ex-decotator.ts

import { SetMetadata } from "@nestjs/common";

export const TYPEORM_EX_CUSTOM_REPOSITORY = "TYPEORM_EX_CUSTOM_REPOSITORY";

export function CustomRepository(entity: Function): ClassDecorator {
  return SetMetadata(TYPEORM_EX_CUSTOM_REPOSITORY, entity);
}
이 코드는 @EntityRepository()를 대체할 코드입니다. 벌써부터 어질어질합니다......
vsCode 정의 기능으로 SetMetadata를 읽어 봅시다.
/**
 * Decorator that assigns metadata to the class/function using the
 * specified `key`.
 *
 * Requires two parameters:
 * - `key` - a value defining the key under which the metadata is stored
 * - `value` - metadata to be associated with `key`
 *
 * This metadata can be reflected using the `Reflector` class.
 *
 * Example: `@SetMetadata('roles', ['admin'])`
 *
 * @see [Reflection](https://docs.nestjs.com/guards#reflection)
 *
 * @publicApi
 */
export declare const SetMetadata: <K = string, V = any>(metadataKey: K, metadataValue: V) => CustomDecorator<K>;
이 외계어를 최대한 해석해 보겠습니다. 위 코드는 key : value형태를 인자로 받고 있습니다. 여기서 key는 TYPEORM_EX_CUSTOM_REPOSITORY가 되고, entity가 value값이 되는 것입니다.
다이나믹 모듈 생성
아래 동적 모듈은 위에서 작성한 @CustomRepository가 적용된 레파지토리를 받아줄 모듈입니다.
// typeorm-ex.module.ts

import { DynamicModule, Provider } from '@nestjs/common'
import { getDataSourceToken } from '@nestjs/typeorm'
import { DataSource } from 'typeorm'
import { TYPEORM_EX_CUSTOM_REPOSITORY } from './typeorm-ex.decorator'

export class TypeOrmExModule {
  public static forCustomRepository<T extends new (...args: any[]) => any>(
    repositories: T[],
  ): DynamicModule {
    const providers: Provider[] = []

    for (const repository of repositories) {
      const entity = Reflect.getMetadata(
        TYPEORM_EX_CUSTOM_REPOSITORY,
        repository,
      )

      if (!entity) {
        continue
      }

      providers.push({
        inject: [getDataSourceToken()],
        provide: repository,
        useFactory: (dataSource: DataSource): typeof repository => {
          const baseRepository = dataSource.getRepository<any>(entity)
          return new repository(
            baseRepository.target,
            baseRepository.manager,
            baseRepository.queryRunner,
          )
        },
      })
    }

    return {
      exports: providers,
      module: TypeOrmExModule,
      providers,
    }
  }
}
아직까지 위 코드를 정확히 이해하고 내 코드로 습득하지는 못했다.......
모듈에 적용시키기
-> user.repository.ts

-> user.service.ts

보다시피 서비스에서 @injectRepository를 사용하지 않았다.
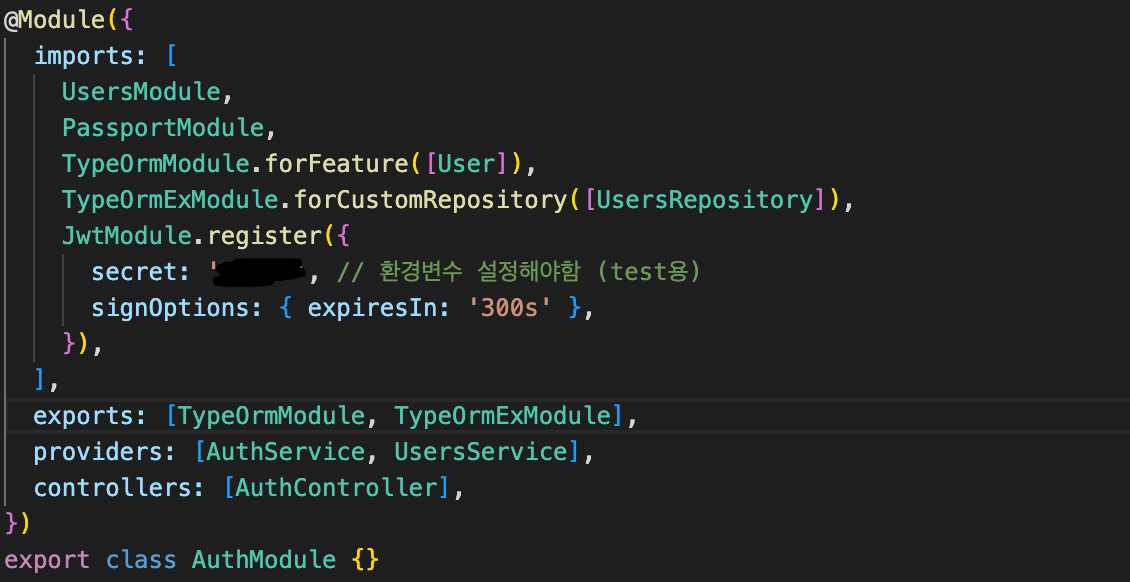
-> auth.module에 imports 부분을 보면 forCustomRepository로 불러온다.
-> app.module에 entities에 User를 추가해 주면 된다

출처:

'Project' 카테고리의 다른 글
[Project] Nest Lifecycle 이해하기 (0) 2023.07.14 [Project] Nest 페이지네이션 넘어져보기 (cursor, offset기반) Feat: TypeORM (0) 2023.07.04 [Project] Nest seeding 해보기 (typeorm-extension사용) (0) 2023.06.28